Welcome to In Focus Photo Retouching Tips: fixing over exposed photos. A digital photo retouching tutorial that I will be blogging about to help improve your photos. For you to become less dependent on me: “the photo retoucher” for all your photo editing.
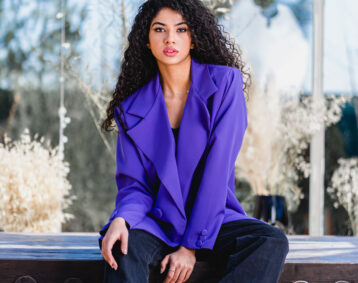
The first in the series of tips is: a very simple way to correct over exposed photos using Photoshop. Take for example this studio photo: which was over exposed for this tutorial:
a digital photo retouching tutorial on correcting exposure
For this tutorial, you will need to be able to access the layers and channels tabs. By default they on the bottom right side of the window. iIf you cannot see the channels and layers tab, go to the top of the page and click the “window” button. The dropdown will appear. Click with your mouse: “layers” and “channels”. Once ticked (active) they will appear in the interface. Now you are ready to proceed.
To correct the exposure, all you do is open the photo in Photoshop, and click on the channels tab. Hold down the control key (command in mac) on your keyboard.
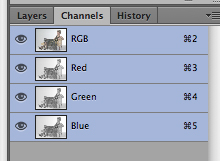
Then hover over the RGB window (the miniature image of your photo) with the cursor and click your mouse. You should see a set of marching ants appear in the main photo. As if you have been clicking the image with your magic wand tool. Once you see the marching ants. Click on the layers tab to open it, and with the layers tab open, hold down control/command and press “J” on your keyboard.

You will see a new layer appear above the background layer. At this point you will not see any difference to the photo. Change the layer blending mode from “normal” (which is the default layer property), to “multiply”. See above image) by using the dropdown. The highlights will be less over exposed. If they still need adjusting, all you do is duplicate the layer (layer 1). Do this until your photo has a more balanced exposure.

There you have it, a simple way to retouch your own photos to correct an overexposed image. Please note, the example photos used, were not retouched at all. The only thing adjusted was the highlight exposure.
If you found the article use. Follow my blog as I will be adding more articles on how to improve your photo retouching skills.