In My latest post “Speed up retouching workflow”. I have another suggestion on how you can optimise your time retouching photos. For this I would like to introduce you to Adobe Lightroom. When I first started retouching photos, my trusted application was Adobe Photoshop. This has not changed at all. It is is still my “go to” whenever I edit a photo. But with time I have learnt a few handy photo retouching workarounds using other applications.
This is why I would like to talk about Adobe Lightroom. Like Photoshop it is a powerful photo editing tool. In certain instances it do the job a lot faster than Photoshop.
For example, there are times that I receive retouching enquiries from photographers who have not set up their camera. All their photos from a shoot are not correctly white balanced. If there are only one or two photos to correct. Then there is no real difference if you use Photoshop or Lightroom for your digital editing.
It is when you have received a bulk set of say over 100 photos to adjust the colour balance. This is where in my mind Lightroom wins for its speed of bulk photo editing.
I will not go into all the functionality of using Lightroom. Here are a few of the basic steps to get started and import your photos that need editing into the application.
Make sure you have your retouching work in labelled folders on your computer. I know it is tempting but I would avoid placing everything on the desktop. As this uses more RAM than if you store in your “photos” or “documents folder” for example.
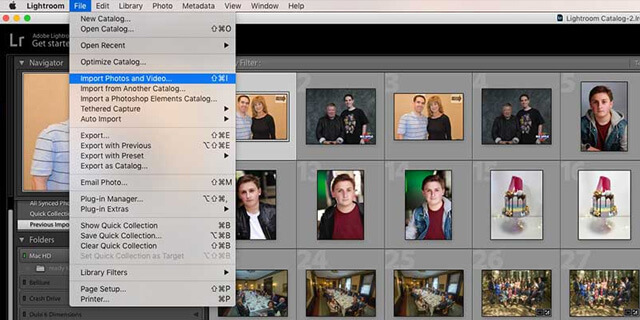
Open Lightroom and click “import photos”. A new panel will open and you navigate to the folder or subfolder that you want to import. Once you have found the folder with the batch photos that need retouching, click “import”.
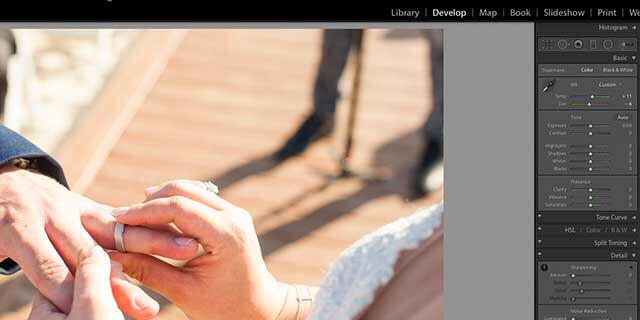
Once you import the photos, you can then start the retouching. On the top right bar you will see “Library”, click on “Develop” which is the next module. Once in develop mode, you can do the adjustments to the photo to get the correct colour balance. The “Develop” interface is very similar to when you open a RAW or DNG file in Photoshop. Below is an example of an incorrectly colour balanced photo.

On the right hand side of the photo that you are retouching, you will see various panels. The ones I usually use for colour correction is the “Basic Panel” where you can do most of the editing. If you feel you need to do more adjustments to the image, there is the “Tone Curve”, “Detail” and Lens Correction” panels. Have a play with the sliders, lens correction is quite handy. Lightroom recognises many camera lenses.
Lens correction can really enhance a photo. For example some lenses have peripheral distortion or vignetting. Clicking on lens correction can make a big difference to the edit. Another handy tool for retouching the photo is the detail box. This includes the sharpness and noise reduction sliders. Once you are happy with the enhanced photo you can export it.

I would suggest you send your client one or two retouch samples for them to check. With the client’s feedback. You can make a few adjustments if necessary to the photo and resend the retouch. Once the client is completely satisfied with the colour correction sample. You can then bulk apply the retouch to all the photos.
There are two ways of doing this, you can click on the ready retouched photo to highlight it in Lightroom. Then navigate to the develop button on the top left, click on it and in the dropdown you will see “New Preset”.
Click on new preset and you will have the opportunity to give the new preset a name.
Once you have named the preset, this retouch information is saved as a develop presets. All the presets are on the left side of the window. All you need to do to edit the rest of the photos in the batch, is click on each of them and then click on the preset. You will see the photo colour corrected based on the settings you saved as a develop preset.
Or you can select all the photos, clicking on the already edited photo. And then navigating to “edit”, “select all”. You will see all the photos in the batch highlighted. With them all highlighted you can then press “Sync” on the bottom right. All the photos will be retouched, the preset will be applied to all the photos.
That is it, you can then export all the edited photos to send to the client. There is a function in the “Export” dialogue that allows you to resize the photos. This is handy if you want to send lower resolution photos as retouch samples. You can also watermark the photos as a measure of security until you have received payment from the client.

Once you have received approval from the client, you can go ahead and invoice them. Once you have received payment. You can select all the retouched photos and export them at full resolution without a watermark.
Speed up retouching workflow
Using Adobe Lightroom for this type of photo retouching. Has speeded up my retouching workflow. I hope this article has been of some use to you. If you want to speed up retouching workflow, check out or buy Adobe Lightroom here.
I hope the advice has been helpful, follow my blog for more photo retouching tips.