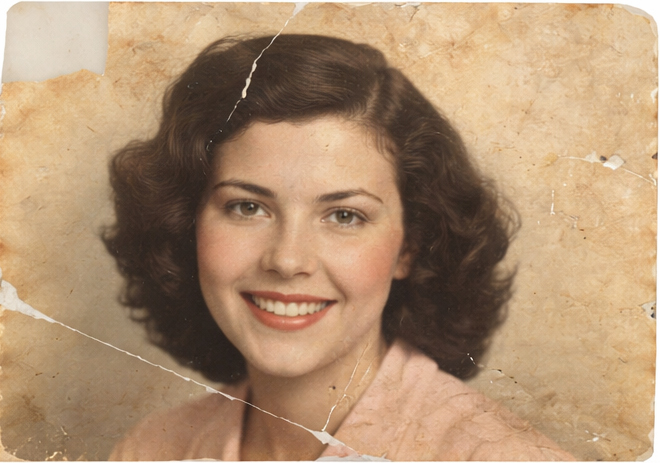
A detailed example of a professional photo restoration workflow — from initial scan to final restored image.
Professional photo restoration workflow
In today’s world of one-click filters and AI-powered enhancements, many assume that restoring an old photograph is simply a matter of pressing a button. But true restoration is not automation — it’s interpretation.
This article breaks down the professional photo restoration workflow, showing exactly how a damaged photograph moves from scan to final restored image. More importantly, it reveals the human decisions that no automated tool can fully replicate.
Because restoration isn’t just about fixing pixels. It’s about understanding history, emotion, and intent.
Step 1: High-Resolution Scanning — Protecting the Original
Every restoration begins with preservation.
Before any editing takes place, the photograph must be scanned at a resolution high enough to capture texture, grain, and fine detail. This step determines how much usable data we have to work with.
AI tools often skip this nuance. They prioritise speed over data integrity. But in a human photo restoration process, we treat scanning as archival preservation — not just preparation.
Decisions at this stage include:
-
Choosing appropriate DPI based on print size
-
Avoiding automatic contrast adjustments from scanners
-
Preserving tonal range without clipping highlights or shadows
Automation focuses on enhancement. A professional workflow focuses on protection first.
Step 2: Initial Assessment — Reading the Image
This is where the human element becomes critical.
Before touching any tools, we evaluate:
-
What type of damage is present? (tears, scratches, fading, stains)
-
Is the photo silver-based, colour, sepia?
-
Are we restoring for historical accuracy or aesthetic enhancement?
-
What is the emotional importance of the image?
Why AI can’t replace human photo restoration. AI restoration tools treat every image as a technical problem. Human restoration treats each image as a unique story This assessment shapes every decision that follows.
Step 3: Structural Repair — Rebuilding Without Rewriting
In this phase of the photo restoration step-by-step process, visible damage is carefully repaired.
This includes:
-
Cloning and healing tears and scratches
-
Reconstructing missing areas manually
-
Rebuilding texture to match original grain
AI often fills missing areas with guesses.
A professional retoucher rebuilds based on context, light direction, and anatomical accuracy.
This is where manual photo retouching vs AI becomes obvious: automation can approximate — but it cannot reason.

Step 4: Tonal and Colour Correction — Restoring Balance
Old photographs fade unevenly. Paper ages. Colour shifts unpredictably.
A professional workflow requires:
-
Manual white balance correction
-
Shadow and highlight recovery
-
Skin tone refinement
-
Rebalancing contrast without crushing detail
AI enhancement tools frequently over-correct:
-
Over-saturating colours
-
Over-sharpening faces
-
Removing natural texture
A human approach preserves character while improving clarity.
Restoration is about balance — not transformation.
Step 5: Detail Refinement — Preserving Authenticity
Once structural and tonal repairs are complete, refinement begins.
This stage includes:
-
Subtle sharpening (not artificial crispness)
-
Texture preservation
-
Removing remaining artefacts
-
Zoom-level quality control
A true professional photo restoration workflow involves constant zooming in and out — checking both micro-detail and overall composition.
Automation works at one level.
Human restoration evaluates at multiple scales.
Step 6: Final Output Preparation — From Scan to Final Restored Image
The final step is often overlooked.
The restored image must be:
-
Prepared for print resolution
-
Converted to appropriate colour space
-
Saved in archival formats
-
Delivered in client-ready formats
This is the completion phase of moving from scan to final restored image — ensuring the result is not just beautiful, but usable.
Why Human Decisions Still Matter
AI restoration tools are improving. They can remove scratches quickly and colourise faded images in seconds.
But they cannot:
-
Understand family significance
-
Distinguish intentional blur from damage
-
Preserve emotional authenticity
-
Make ethical decisions about alteration
The difference between automated enhancement and professional restoration lies in judgment.
Automation fills gaps.
Human restoration interprets meaning. See a real-world before and after restoration case study
Frequently Asked Questions
Is AI photo restoration good enough?
AI tools can improve basic damage quickly, but they often over-process images and lack contextual judgment. For historically or emotionally important photographs, professional restoration delivers more accurate and authentic results.
How long does professional photo restoration take?
It depends on the damage level. Minor repairs may take a few hours, while complex reconstructions can require extensive manual work to ensure accuracy.
Can badly damaged photos really be restored?
In many cases, yes. Severe tears, fading, and staining can often be repaired through a careful, step-by-step human restoration process.
What is the difference between retouching and restoration?
Retouching enhances an image. Restoration repairs damage and reconstructs missing information while preserving authenticity.
Final Thoughts
The true difference between automation and craftsmanship lies in intention.
A human photo restoration process doesn’t just correct pixels — it protects memories. From careful scanning to detailed refinement, every stage of a professional photo restoration workflow is built on judgment, restraint, and experience.
From scan to final image, restoration remains — at its core — a human art.